
Setting up a printer is easy, and you can learn it in no time. With all my experience, I am going to write down everything for the setup in simple steps, and you will learn how to setup Epson printer to WiFi easily.
Epson printers are easy-to-use devices that provide incredible results. You can easily print, copy, or scan almost anything you want with this printer. To setup your Epson printer, you will need to unbox it and check for all the necessary items. After that, connect the printer to a WiFi network. Once your printer is connected to WiFi, connect the printer to your computer and download the driver software. When you download and select the printer on it, your setup process is complete. For a detailed guide, keep reading this post properly.
Setting up an Epson Printer
Before you find out how to connect Epson printer to WiFi, you should learn how to setup it up. To setup the printer, you should first unbox it and check for accessories. Follow the steps written below to setup the machine.
- In the beginning, open the printer box and check all the tools and supplies.
- Then, place the printer on a safe and flat surface.
- After that, plug the power adaptor into the electricity and switch on the printer.
- Once you give power to the printer, connect the printer to a wireless network.
- Next, you should connect the printer to the computer with USB, Bluetooth, or WiFi so that you can choose an image or page to print from your device. You can also scan any document and upload it or send it to someone on the Internet.
- When your printer is connected to the computer, you have to download the driver.
- In the end, log into the software with an Epson account.
How to Setup Epson Printer to WiFi?
When you have learned how to setup the printer, you can connect it to WiFi. Follow these steps, and you will be able to connect your printer to a wireless network.
- To start, you should access the WiFi settings on your printer.
- To do so, go to the Home screen on your printer and open the Settings tab.
- Once you go to Settings, opt for the General setting and tap OK.
- Select the network settings and click on WiFi Setup.
- Then, choose the first option – WiFi Recommended.
- Again, when you are ready to start, click on Setup.
- You will see multiple options; select the WiFi Setup Wizard option
- Now, the printer will search for wireless routers. Next, select your WiFi name.
- Here, enter the router password or network key.
- Finally, your computer and the printer will be connected.
How to Connect Epson Printer to Computer?
Once you have connected the printer to the WiFi router, you need to connect your computer to the same wireless network. Then, the computer will be linked to the printer through WiFi. This process can be done before connecting the printer to WiFi with the same result. Follow the steps below:
- Go to the Start menu on your computer and open the connection settings.
- Then, access the WiFi settings and search for the WiFi router.
- When you see it, enter the password when prompted.
- After typing the correct password, the computer will connect to a WiFi router.
- Now, the computer is connected to the printer.
How to Download Epson Printer Software to Computer?
Once you connect your printer to your computer, you should download the Epson software and log in with an Epson account. If you do not have an Epson account, you can create one. Complete the steps in the section below:
- Go to your computer’s internet browser and search for Epson Connect Printer Setup Utility.
- After that, locate the file in your folder and double-click on it.
- Next, you must agree to the End-User License Agreement and click Next.

- Now, download and install the app. Follow the prompts to complete the installation.
- Open the app, then select the product, and tap on Next.
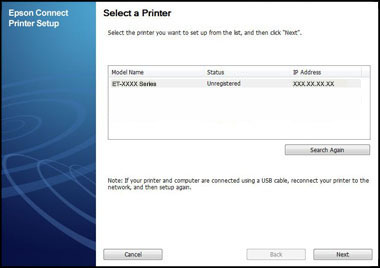
- Next, you have to choose the Printer Registration option and hit Next.
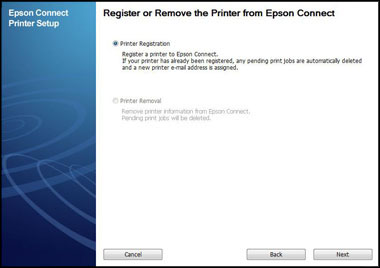
- Here, agree to the terms and again click Next.
- Select the Register a Printer option and press OK.
- Choose the option between Already have an account or Create an Epson Account.
Conclusion
Epson is a great option if you are looking to setup a new printer. With its versatility, you can accomplish multiple tasks and simplify your daily printing. In this post, you have learned ‘how to setup Epson printer to WiFi’. Setting up the printer is easy and can be done in easy steps. First, unbox and set up the printer. Then, connect the printer to a WiFi network and add it to the computer. Now, your Epson printing device is ready to use.